GPIOs on Astra Machina
Astra Machina integrates many GPIOs to support its various functionalities. This guide will cover how to use GPIOs with Astra Machina and configure their functionality.
On Astra Machina:
All of the GPIOs are multiplexed and can be configured for different functionality.
All GPIOs can be assigned interrupts. However, GPO (output only pins) cannot.
Specific details on GPIOs can be found in the Astra Machina Eval Platform.
Accessing GPIOs from Userspace
GPIOs can be accessed and configured using the libgpiod tools. These tools interface with the kernel’s character device interface /dev/gpiochipN
instead of the deprecated sysfs interface.
To identify available GPIO chips and lines, use:
root@sl1680:~# gpiodetect
root@sl1680:~# gpioinfo
GPIOs are accessed by chip and line offset, rather than the legacy global GPIO number.
For example, GPIO[36] on the SL1680 corresponds to line offset 4 on its GPIO controller (see GPIO Mappings).
To read the value of GPIO[36]:
root@sl1680:~# gpioget -c gpiochip1 4
"4"=active
To configure GPIO[36] as an output and set it high. The command will hold the line high until it exits.
root@sl1680:~# gpioset -c gpiochip1 4=1
To set GPIO[36] low. The command will hold the line low until it exits.
root@sl1680:~# gpioset -c gpiochip1 4=0
The libgpiod tools support input and output. The gpioget program requests the line as an input whereas
gpioset requests the line as an output. The line is released automatically when the command exits.
Note
Unlike the legacy sysfs interface, the GPIO value is only driven while the
process holds the line. When gpioset exits, the line is released and its
state is no longer guaranteed. Run gpioset in the background to hold the line
while working with gpios.
Changing the Function of GPIOs
GPIOs which are assigned to other functionality can be reconfigured to function as generic GPIOs. This is done by updating
the device tree entries in the Linux Kernel. This requires modifying the linux-syna package using devtool:
devtool modify linux-syna
Modify the platform dts file located in build-sl1680/workspace/sources/linux-syna/arch/arm64/boot/dts/synaptics.
SL1620 |
SL1640 |
SL1680 |
SL261x |
|
DTS |
myna2-rdk.dts |
platypus-rdk.dts |
dolphin-rdk.dts |
sl261*-rdk.dts |
First, identify where the GPIOs are currently configured in the dts file and disable them. Then reassign them to function as GPIOs.
The following example will reassign GPIO[12] and GPIO[13] to function as GPIOs in SL1620.
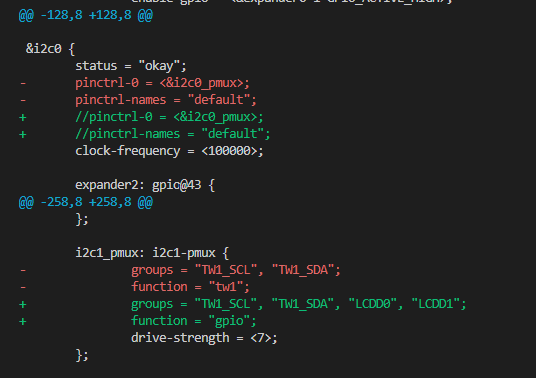

Build the image with the updated device tree entries:
devtool build linux-syna
devtool build-image astra-media
GPIO Mappings
Userspace GPIO IDs are assigned based on the gpiochip number which is assigned dynamically. Changes in the device configuration, such as updating the device tree (DTS), can cause the gpiochip number to change. Therefore, userspace GPIO IDs need to be calculated using the current gpiochip number assigned to the GPIO port.
GPIOs 0 - 31:
GPIOs 32 - 63:
GPIOs 64 - 95:
To do this calculation start by identifying the gpiochip number for the controller on which the GPIO is attached. The address will match
the GPIO ports in the tables below. Find which gpiochip is associated with which GPIO port by running gpiodetect. The output
will contain the GPIO port address of the port associated with the gpiochip.

gpiochip numbers on SL1680
The following examples show how to calculate GPIO IDs for various GPIOs. Using the gpiochip number associated with the GPIO port.
Calculate GPIO[5]:
Calculate GPIO[46]:
Calculate GPIO[80]:
SL1620
GPIO Port |
Address |
GPIOs |
|---|---|---|
gpio@0800 |
f7e80800 |
0 to 31 |
gpio@0c00 |
f7e80c00 |
32 to 63 |
gpio@1000 |
f7e81000 |
64 to 95 |
SL1640 / SL1680
GPIO Port |
Address |
GPIOs |
|---|---|---|
gpio@2400 |
f7e82400 |
0 to 31 |
gpio@0800 |
f7e80800 |
32 to 63 |
gpio@0c00 |
f7e80c00 |
64 to 95 |
SL261x
GPIO Port |
Address |
GPIOs |
|---|---|---|
gpio@7000 |
f7f07000 |
0 to 31 |
gpio@e000 |
f7f0e000 |
32 to 63 |
Note
Mappings may change if based on modifications to devicetree. The tables above are for reference only and may not be accurate for all configurations.
SM GPIO Mappings
The System Manager (SM) has its own GPIO controller separate from the SOC GPIOs documented above.
SM GPIOs are directly managed by the M52 core running the system manager firmware, but are also
accessible from Linux via libgpiod.
Note
SM GPIO pin muxing is controlled by the SM firmware device tree (Zephyr or FreeRTOS side), not the Linux device tree. Changing the function of SM GPIOs requires updating the system manager firmware configuration.
SL1620
The SM GPIO controller on SL1620 supports 12 SM_GPIOs: SM_GPIO[0:11].
Register Block |
Address |
SM GPIOs |
|---|---|---|
GPIO0 |
f7e80000 |
SM_GPIO[0:11] |
For SL1620, the SM_GPIO Linux GPIO group maps as follows:
SM GPIOs |
Linux GPIO Port |
|---|---|
SM_GPIO0 ~ SM_GPIO11 |
portb 0 ~ 11 |
SL261x
The SM GPIO controller supports 39 SM_GPIOs: SM_GPIO[0:38].
In the register view, the SM GPIO block is split as:
Register Block |
Address |
SM GPIOs |
|---|---|---|
GPIO0 |
e5038000 |
SM_GPIO[0:15] |
GPIO1 |
e5039000 |
SM_GPIO[16:23] |
GPIO2 |
e503a000 |
SM_GPIO[24:31] |
GPIO3 |
e503b000 |
SM_GPIO[32:38] |
For SL261x, the SM_GPIO Linux GPIO groups map as follows:
SM GPIOs |
Linux GPIO Port |
|---|---|
SM_GPIO0 ~ SM_GPIO15 |
portc 0 ~ 15 |
SM_GPIO16 ~ SM_GPIO23 |
portd 0 ~ 7 |
SM_GPIO24 ~ SM_GPIO31 |
porte 0 ~ 7 |
SM_GPIO32 ~ SM_GPIO38 |
portf 0 ~ 6 |
Accessing SM GPIOs from Linux
Use gpiodetect to identify which gpiochip corresponds to each SM GPIO block:
root@sl2619:~# gpiodetect
gpiochip0 [0-0043] (8 lines)
gpiochip1 [0-0044] (8 lines)
gpiochip2 [e5038000.gpio] (16 lines)
gpiochip3 [e5039000.gpio] (8 lines)
gpiochip4 [e503a000.gpio] (8 lines)
gpiochip5 [e503b000.gpio] (8 lines)
gpiochip6 [f7f07000.gpio] (32 lines)
gpiochip7 [f7f0e000.gpio] (32 lines)
In this example:
SM_GPIO[0:15] is on gpiochip2 (e5038000)
SM_GPIO[16:23] is on gpiochip3 (e5039000)
SM_GPIO[24:31] is on gpiochip4 (e503a000)
SM_GPIO[32:38] is on gpiochip5 (e503b000)
To read SM_GPIO5 (line 5 on gpiochip2):
root@sl2619:~# gpioget -c gpiochip2 5
To set SM_GPIO5 high:
root@sl2619:~# gpioset -c gpiochip2 5=1
To read SM_GPIO20 (SM_GPIO[16:23] block, line offset 4 on gpiochip3):
root@sl2619:~# gpioget -c gpiochip3 4
Note
The gpiochip numbers shown above are examples and may differ on your system depending on
device tree configuration. Always run gpiodetect to confirm the current chip-to-address
mapping before accessing SM GPIOs.
SM GPIO ID Calculation
SM GPIOs follow the same ID calculation as SOC GPIOs. Use the gpiochip base number for the SM GPIO controller block and add the line offset.
SM_GPIO[0:15] (gpiochip2, base depends on system):
SM_GPIO[16:23] (gpiochip3):
SM_GPIO[24:31] (gpiochip4):
SM_GPIO[32:38] (gpiochip5):